Friday, 24 July 2015

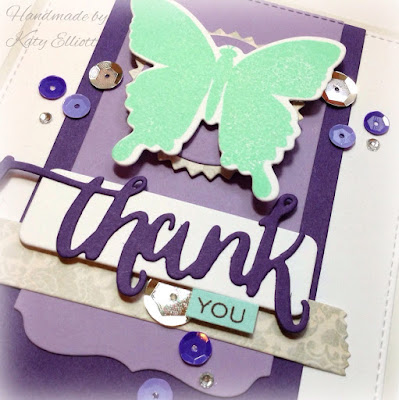
Thank You

A quick card share today, supplies same as yesterday's card.


I love the mint and silver grey colours together.


I added a little stencil detail to one of the diecut panels.


Thanks for stopping by today.

You can follow me on instagram: @katy.elliott

You can buy this card here.

Thursday, 23 July 2015

You Are So Loved

Using much the same 'recipe' as the last few cards, I created this using paper and card scraps and Blueprints 13 die-namics from MFT.


I used another butterfly image from Papertrey ink for the focal point.


Doodlebug sequins finish the card off nicely.


Thanks for stopping by today :)

You can follow me on instagram: @katy.elliott

You can buy this card here.

Tuesday, 21 July 2015

You are the best

Today's card is pretty much following the same idea as yesterday's card. This time I used an interesting colour combo of grey, mint, coral and gold.


Same supplies as yesterday, except a different sentiment and a little stencilling on one of the diecut panels using a bubbles stencil from Dylusions.


I feel very good about these latest cards, as my scrap pile seems to be getting smaller and I'm using colours that I probably wouldn't normally use together.


Thanks for stopping by!

You can follow me on instagram: @katy.elliott

You can buy this card here.

Monday, 20 July 2015

Thank You

Another card following the same layout as yesterday, this time I changed up the sentiment and colours and left out the stencilling and stars.


The butterfly stamp and coordinating die is from Beautiful Butterflies from Papertrey ink. They just brought out the matching layer stamps for these butterflies which are on my wish list!


The 'thank' diecut and 'you' stamp are from Wplus9 stamp and die sets.


That's it for today, pretty simple but I like the layers and it's fun to make these in batches. Also a great way to use up scraps which I know all us crafters have in abundance!

You can follow me on instagram @katy.elliott

You can buy this card here.

Sunday, 19 July 2015

You are one of a kind

Hi! Today I have a card to share using an inspiration layout from MFT for the Blueprints 13 die-namics. You'll be seeing a few of these layouts over the coming days as they are so fun to reproduce.


I popped some elements up on foam pads to add dimension and stencilled the kraft panel with a stars stencil from Simon Says Stamp.


The 'you' diecut is from Wplus9 and so is the accompanying stamped sentiment.

I added my usual embellishments - sequins from Darice and Doodlebug and a few rhinestones from my stash.

Thanks so much if you stopped by today.

You can follow me on instagram: @katy.elliott

You can buy this card here.


Saturday, 18 July 2015

Thinking of you

Here's a card made using Blueprints 13 Dienamics from My Favorite Things, Hand Lettered Thanks stamps and dies from Wplus9 and Happiness in Bloom dies from Papertrey ink.


I chose to make a card using mainly die cuts as I wanted to try and make a dent in my ever-growing box of scraps!


As usual I embellished with sequins and rhinestones to finish.


That's it for today, thanks for stopping by :) follow me on instagram: @katy.elliott

If you would like to purchase this card you can find it here.

Friday, 17 July 2015

Best Wishes

If this card looks familiar, it's because I made a very similar one yesterday! The supplies used are the same so if you're looking for anything please check yesterday's blog post for details.


 This time round, I coloured the image in different colours and selected some Papertrey ink dye inks to match my image: Berry Sorbet, Pure Poppy, Scarlet Jewel, Ocean Tides, Spring Moss, Ripe Avocado, Aqua Mist, Hawaiian Shores and Smokey Shadow.


I added Doodlebug sequins ( a favourite item that features on almost all my cards!) before layering the whole panel onto some matching coloured cardstock.


Thank you for reading my blog today :) please follow me on instagram: @katy.elliott

If you'd like to buy this card, you can find it here.

Thursday, 16 July 2015

Birthday Wishes

I treated myself to a few stamps and dies from Wplus9 - Basic Banners and Watercolored Anemones, with the idea of making cards with floral wreaths and sentiment banners.

I used an old stamp set (I forget where from) to stamp the camper van with Memento Tuxedo Black ink so that I could colour it with my alcohol markers.


 I then picked out some Papertrey ink dye inks to match my image: Spring Rain, Blueberry Sky, Ocean Tides, Limeade Ice, Aqua Mist, Hawaiian Shores and Smokey Shadow.


 I die cut a few sets of flowers and leaves and one banner and stamped them with the different coloured inks. I popped a few flowers and the centre of the banner up on foam pads to add dimension.


To fill in the gaps in the wreath I used a few flowers from Papertrey ink's Mini Blooms and Bigger Blooms stamp and die sets.

Thank you for reading my blog today :) please follow me on instagram: @katy.elliott

If you'd like to buy this card, you can find it here.

Wednesday, 15 July 2015

Congratulations

'Oh, what a surprise' I hear you say! It's another card made with the Mini Blooms set from Papertrey ink. Well I'm sorry, I just LOVE this set! It's so pretty and I can make so many different designs, I never tire of playing with it :)


First things first - I have to admit that I borrowed completely stole this layout from Pinterest and then tracked down the original by Maile Belles. Please pop over to her blog post to see how she made her card.


I changed up a few things, such as the sentiment, the colours and added further embellishments in the way of sequins and rhinestones. I hope Maile won't mind that I used her card as a CASE it was just too beautiful.


Thanks for stopping by today, remember to follow me on instagram: @katy.elliott

Tuesday, 14 July 2015

Hello

 Today I'm sharing a set of three 'hello' cards I made using my favourite stamp set from Papertrey ink - Mini Blooms.


Once you get started with the main design and placing of images, these are quite fun and easy to re-produce.
 

I began by drawing around a roll of tape with a light pencil line to give me a circular shape to follow for my wreath. I then stamped the leaves, erasing the pencil line in it's place beforehand. As the inks I used are dye inks, I think you can get away with erasing the pencil marks after stamping, as long as the inks are completely dry.


I made a few colourways to make the set more interesting, also they are handmade cards so each one should be a little different in my opinion ;)


Teamed with three crisp white envelopes, this set is perfect to have on hand for when you need a small card to attach to a gift or bunch of flowers.

Thanks for stopping by today - please follow me on instagram: @katy.elliott

If you'd like to purchase this set of cards, you can find them here.

Monday, 13 July 2015

On the road again

Hello and welcome to another blog post with another card. Today's card uses an old stamp set that I wanted to give some love to. I have no idea what company it's from but it has some really cute camping and travel themed images.


I started by masking off a heart shape onto a piece of plain white card and stamping images from the set randomly. I coloured the images with my Spectrum Noir alcchol markers and then swiped a little distress ink around the edge of the mask to make the heart shape more obvious.


I cut out the heart leaving a little white border, then I ran a black marker around the edge to define it. For the background I decided to do some watercolouring with distress inks, picking out colours from the main images. I added sequins from Doodlebug in places and mounted the heart on foam squares to finish.


I find watercolour so therapeutic and there are lots of ways to achieve these washy looks with so many water-loving products on the market nowadays - distress inks are by far my favourite!

Thank you for stopping by today. Please follow m on instagram: @katy.elliott
 

Sunday, 12 July 2015

So happy for you

OK, just one more card using the circle mask technique and then we'll move on to something different! I promise ;)


As in yesterday's card I used a circle die to cut a shape in a large sheet of paper and stuck it onto my card front with repositionable tape to act as a mask.

I used dye inks from Papertrey ink in the following colours: Scarlet Jewel, Limeade Ice, Ocean Tides, Sweet Blush and Enchanted Evening to stamp images from various (and very ancient!) Inkadinkado stamp sets around the edge of the masked circle. The sentiment is from Mini Blooms also by Papertrey ink.

To finish, I added a few Doodlebug sequins and rhinestones from my stash and stamped two butterflies using another set from Papertrey ink.
Thank you for stopping by today. Please follow me on instagram: @katy.elliott

Saturday, 11 July 2015

Make today beautiful

Today I'm sharing a similar card to yesterday's - I think this circle mask technique is so much fun and by changing the colours, stamp set or both, you get a completely different look every time. This card uses Papertrey ink's Happiness in Bloom and Mini Blooms stamp sets along with a very old Inkadinkado stamp for one of the flowers. I used my Simply Fabulous Saying stamp set from MFT for the sentiment.


As in yesterday's card, I used a circle die to cut a shape in a large sheet of paper and stuck it onto my card front with repositionable tape to act as a mask.
I used dye inks from Papertrey ink in the following colours: Dark Chocolate, New Leaf, Limeade Ice, Hibiscus Burst and Ocean Tides to stamp images from the stamp sets around the edge of the masked circle.

To finish, I added a few Doodlebug sequins and rhinestones from my stash and stamped two butterflies using another set from Papertrey ink.
Thank you for stopping by today. Please follow me on instagram: @katy.elliott

Friday, 10 July 2015

A good life...

A good life is a collection of happy moments - I love this quote from Papertrey ink's Happiness in bloom stamp set. I used it as the focus of my card.


I use a circle die to cut a shape in a large sheet of paper and stuck it onto my card front with repositionable tape to act as a mask.


I used dye inks from Papertrey ink in the following colours: Dark Chocolate, New Leaf, Classic Kraft, Orange Zest, Summer Sunrise, Lemon Tart and Harvest Gold to stamp images from the stamp set around the edge of the masked circle.


To finish, I added a few Doodlebug sequins and rhinestones from my stash and stamped two butterflies using another set from Papertrey ink.

Thank you for stopping by today. Please follow me on instagram: @katy.elliott
 

Thursday, 9 July 2015

'Dad' card with sail boat

I made this card a couple months ago, and used Spectrum Noir markers to colour the image and Tim Holtz distress inks to give it an aged effect.


I used patterned paper from Prima, cardstock letters from Doodlebug and finished with an anchor charm and bakers twine.


I'm not fond of making mens cards due to the lack of pretty flowers and embellishments but I like how this one turned out.


Thanks for stopping by, please follow my instagram: @katy.elliott

Wednesday, 8 July 2015

Putting down roots

Today I have a fun new home card to share, created using the Putting Down Roots stamp and die sets from Papertrey ink.


Since the coordinating dies are only available to cut the pots, I had to fussy cut out the third cactus to layer it on top of the plant pot.
  

I used Premium dye inks also from Papertrey ink in the following colours: Spring Moss, New Leaf, Aqua Mist, Ocean Tides, Classic Kraft, Dark Chocolate and Hibiscus Burst and the matching cardstock in: Ocean Tides and Hibiscus Burst.


 I finished off the inside by stamping some details in one corner.

Thanks for stopping by today!

Please follow me on instagram: @katy.elliott

If you would like to buy this card, you can find it here

Tuesday, 7 July 2015

Perry on her laptop

Today I'm sharing a card with a gorgeous Stamping Bella stamp called Perry on her laptop.


That chair was crying out to be paper pieced! My first job was to find some patterned paper that would work well. I also had a scrap of red and white striped paper that I really wanted to incorporate, and that's where I got the colour scheme from.


After a LOT of fussy cutting I added shadows on the chair so it looked a part of the image.


I added some simple die cut leaves using a Spellbinders die, a banner cut from kraft cardstock stamped with a sentiment from MFT and some handmade paper flowers from iamroses.


Additional supplies:
Organza ribbon, patterned text paper, coloured cardstock, MFT circle stax dies 1 and 2.

Thanks for stopping by, please follow me on instagram: @katy.elliott